Alarms & recipes
Two features that turn a dashboard into an operations tool: condition-based alarms with acknowledgement, and recipes — named parameter sets you push to and pull from live variables.
Define an alarm
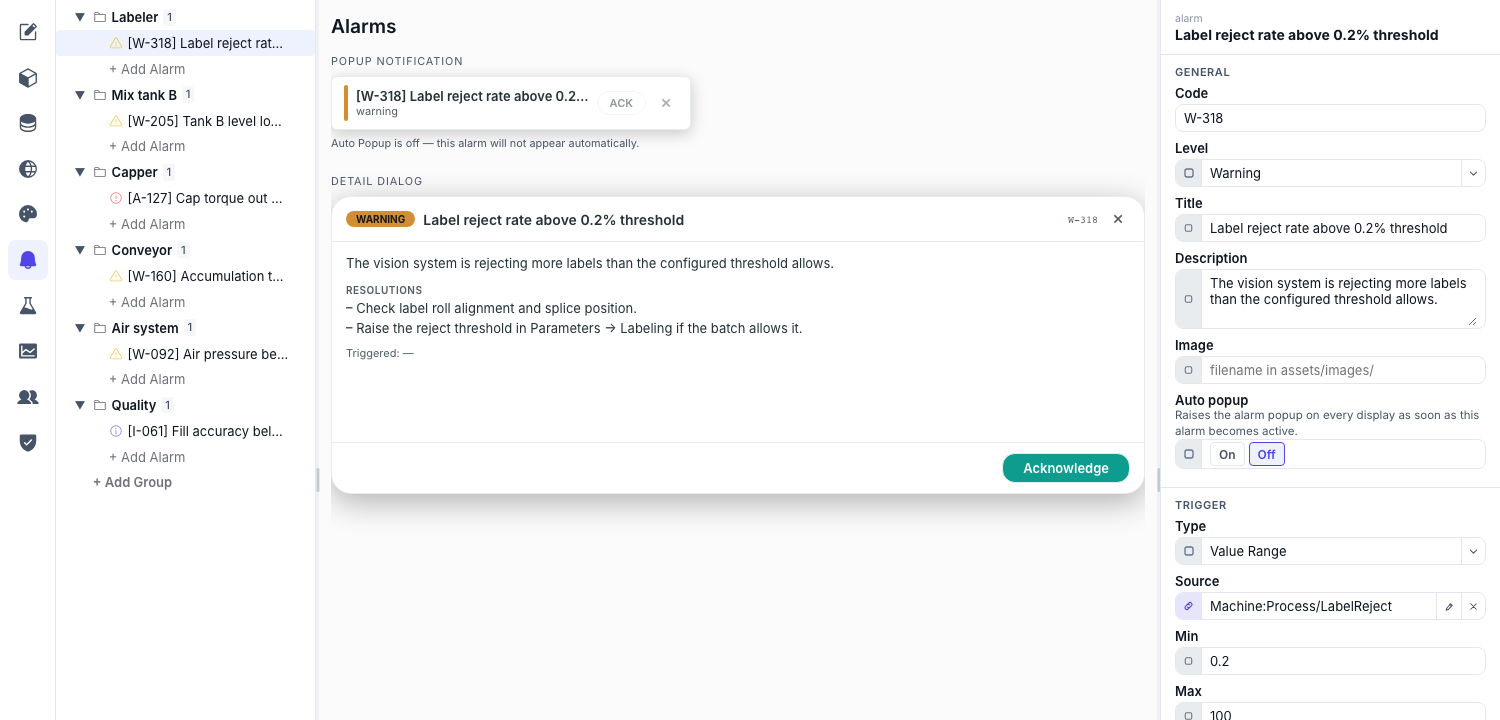
- Open the Alarms area — Add an alarm (organise them in groups if you like).
- Point it at a variable — Bind the alarm's Source to the tag it watches.
- Choose a trigger type — Boolean — fires on
trueorfalse. Value Range — fires outside a Min / Max threshold. - Set severity & presentation — Pick Error, Warning or Info, give it a Code (
W-318), a Title and a Description, and optionally an Image (a filename inassets/images/).
Three more fields turn a definition into something an operator can act on:
- Auto popup — On raises the alarm popup on every display the moment the alarm goes active. Leave it Off and it only shows up in the lists.
- Resolutions — an ordered list of what to check or do, shown in the alarm's detail dialog. This is where the tribal knowledge goes, instead of in a folder nobody opens.
- Acknowledgment permissions → Allowed groups — who may acknowledge it. Empty means anyone; set it and only those groups can clear the alarm. See Users, groups & permissions.
The centre of the editor previews both surfaces live — the popup notification and the detail dialog — so you can see what the operator will read while you write it.
Surface them with the Alarm List and Alarm History widgets, and show a live count anywhere with the $alarmCount source (filter by all / unacked / error / warning / info). Both widgets carry an Own frame toggle — turn it off when the widget sits in a card that already draws one, and clear the Title to drop its header band too.
An alarm's source tag is subscribed whether or not any page shows it, so alarms keep evaluating on screens that never display them.
Build a recipe
- Create a dataset type — In the Recipes area, add a dataset type — the shape of one recipe (e.g. "Product profile").
- Add parameters — For each value in the recipe, click + Add and give it a label and a binding to the variable it maps to; the data type follows from the tag.
- Save datasets — Store named datasets under the type — one per product, grade or batch.
The two runtime operations are download — writing a dataset's values to their variables, loading the recipe into the machine — and upload, capturing current live values back into a dataset.
Put a recipe screen in front of the operator
The two operations are ordinary actions — put Recipe: Load and Recipe: Save on a Button, with the dataset either fixed or bound, and onSuccess / onFailed handlers to tell the operator how it went. Verify on a load reads the values back and fails the action if they didn't take.
What has no built-in widget is the selection UI — the grid of saved datasets — because what a recipe screen should look like varies too much between plants. Build that as a custom widget, which is a short job with the pieces the SDK hands you:
- Bind a
record-listfield to the$recipeListsource for the grid of saved datasets. - Read state with
$recipe— Loaded recipe name (activeName), Is loaded (loaded), or Parameters changed (parametersChanged, true when live values have drifted from the loaded set). - Call
recipeDownload(datasetId)andrecipeUpload(datasetId)from your buttons, and read the configuration withuseRecipeConfig/useRecipeState.
The same two operations are also available over REST at POST /api/recipes/datasets/{id}/download and /upload, which is the route to take from an external MES or scheduler.